Thursday, 20 September 2018

24th May 1794 Log of the HMS Nymphe

24th May 1794
The Biscay Cruise

Wind :  Southerly 

State of the sea (wind+sea)

Degree   Height (m) Height (ft)  Description
4            1.25–2.50     4.1–8.2     Moderate


Character of the sea swell
Moderate :  Long


The Log:


HMS Nymphe
Captains Orders for 24th May 1794, Wind southerly.
Course ESE. Full sail.

Thank you Mr Mudge, your knowledge in these matters is without question but I cannot dawdle close-hauled while that slug Quilp steals a march on us. We shall take the Passage du Ras steering between the Tevernnec rocks and the Ile de Sein. I shall take the watch myself until we are clear of the Pointe de Ras.

New orders after we have cleared the Pennemarc rocks: Steer ESE and make for the Ile de Groix with all speed. Dropping anchor we shall lie with its southern promintory to port under furled canvas for the evening.
At four bells on first watch (sunset) we shall up anchor and steer ENE and approach the beach at Plouhinec. Making enough sail to arrive just off the beach at six bells. I shall take proceedings from there.

Gentlemen we are entering the enemy's dog pit; but we are the better dog. Mr Thatcher make sure the lamps have plenty of oil and then beat to quarters if you please.

(aside) Mr Pickwick be so kind as to discover where Mr Mudge has hidden his bottles. Under the cartridge boxes or amongst the livestock are always favourites.

24th May
    First watch: 2000 to 0000
    Middle watch: 0000 to 0400
    Morning watch: 0400 to 0800  
Briefing by the Admiral

    Forenoon watch: 0800 to 1200  48.70N 5.00W


Nymphe clears the Passage du Ras
  Midshipman Fylte recommends Topmen, Watson and Graves, for punishment (Insult to an Officer - Midshipman Flyte)  Incident occurred when Nyphe was tacking before the wind in the Passage du Ras, a manoeuvre of incredible precision.  Mr Mudge earned his money today.

Afternoon watch: 1200 to 1600  47.50N 4.20W 
First Officer recommends that both Topmen were provoked by Flyte,  BUT that you may have to administer a lashing to back up your officer or Discipline will fall.  The Nymphe clears the Pennemarc rocks with her Captain at the helm.  Some movement observed on the cliffs, probably civilians in panic. 

Sighting astern.  Mr Mudge reports that the HMS Satyr is on a converging course some twelve miles astern.  She seems to be a slightly crank vessel, and not as weatherly as Nymphe.

First dog watch: 1600 to 1800    47.40N   4.20W 

Purser Osbourne condemns a meat cask.  First Officer reports having discovered Mr Mudge's supplies of Rum, hidden in the lower cable tier, and refilled them with water. He explains that basically it is a Caribbean Rum, and goes on the explain the history and development of the brand at some length.
The HMS Satyr is now out of sight, presumably somewhere astern.

Last dog watch: 1800 to 2000    47.30N  3.46W  

Ship running silently.  Midshipmen fighting in the gun room.  Mr Ryder and Mr Howe.  Pickwick informs you that the fracas was the result of allegations against Mr Flyte.  "Damn me," he comments, "that idiot Farthingdale may be our best Middie!  At least he doesn`t have the Greek problem."
20.00 46.25N  3.15W    Anchor down south  of the Cats and the Isle de Grois.

25th May

The Position at the beginning of the First watch  46.25N  3.15W    Anchor down south  of the Cats and the Isle de Grois.

The stern lights of two French ships can be seen in the anchorage beside the Isle de Grois (on the Blue X.  One appears to be a big merchantman.  The other seems to be a small warship.  Mr Pickwick comments that basically it is a French corvette and goes on the explain the history and development of this class of ship.  Young Thatcher is keen to lead a cutting out operation.  "They won`t have seen us Sir!"  You have four Ships boats, which can carry:

Launch Forty men
Barge  Forty men
Cutter twenty men
Captain's gig Coxswain and ten

Thatcher is also enraged at Midshipman Flyte.  In private he informs you that the chap is unnatural, and has been making suggestions to young Charles Ryder.  He wishes them separated and will take Ryder into his watch.  A fine young Lieutenant Thatcher!  If only he could stop dancing up and down in excitement all the damn time.

Lt. Blythswick asks if he may entertain the crew with his latest poem, "How Quincy took her up the Ras, an ode."

Your Orders Sir.  Do you rescue the lady from the beach by signalling with your stern lights, or cut out the damn Frenchies in hope of gaining the Admiral vital information on the whereabouts of that French Squadron. 

First watch: 2000 to 0000 
Middle watch: 0000 to 0400

Addendum and Extraneous Signals
Or When the Umpire forgets to note the time of sunset!

Captain Q
“Mr Pickwick, you really do stretch the bounds of credulity. The beginning of First watch and you can only see their stern lights?! It's not sunset for another hour and a half according to the Day Book. Bring me my glass, I'm going up top to take a good look at these "phantom ships". Mr Farthingdale you come up as well, you might learn something *sotto voce* Miracles have been known to happen.”

Uriah the Umpire

Ah, a quick consultation of Old Ma Finnigan's Cider Drinkers Alamanc indicates that sunset at 47.25 degrees is 20.56 Rise is 05.29.  Pickwick will explain that basically the angle of the meridian proves him right and then continue to give you a potted history of Old Ma Finnigan and her Almanac. (http://www.dawnsun.net/astro/suncalc/)
Doesn't change the fact that you still have some light.  Donning your tweed Dawlish Mast Climbing Pantalons you make for the tops.
One thing you see that was not reported is that the HMS Satyr has crept into Quiberon.  He is too far South!  There is a knot of current here running south and he is south of Les Birdivaux rocks, where the chart says "Quiberon."  The bigger question is just what he is doing here!
Pickwick should have told you this, and perhaps he is less efficient than he believes.
In the anchorage you can still see two French ships, a big Merchantman and a Corvette of 20 guns.  The current running south has them pointing their bows north at anchor.  The problem is that they just may be able to see you too, although they are across the Island so perhaps not.  You allow Midshipman Farthingdale a look through your Telescope but he holds it the wrong way around.
It's 20.00hrs Captain.  You have a little light left it seems.  Orders? 

Captain Q
Haul anchor! Battle stations! Straight at the corvette Mr Mudge then swing across her stern and rake her.
Thank God for this southerly Mr Pickwick I do believe we shall have 'em. (aside) Sadly this will put the kibosh on our little rendezvous, the doxie'll bolt as soon as she hears the guns if she's got any sense. Best thing really, wasn't over keen on having a woman aboard. They're bad luck y'know. My father married a woman; never really got over it.
Mr Blythswick make signal to Satyr for Assistance. That's No. 9 Mr Howe, page 62 in Mr Edles' book - I'll be testing you on that tomorrow so I hope you've been swotting. Mr Farthingdale - just try to help where you can.
For England and for the Prize!

Late Note from Uriah the Umpire

The HMS Satyr has signaled her intention to cut out the Vessels in the Isle de Grois anchorage.  He asks you if you can assist him!  the cheek of the man!  You are however well ahead of him, although any vessel in sight of an action can claim on the prize monies.  

Captain Parker (as Opposed to Quilp) will not have his orders back to me until Saturday.  I will set out the table and show you the overhead views before you have to make any tactical decisions.  Good hunting Captain.


How Quincy took Her Up the Ras, an Ode,
by Enoch Topaz Blythswick, the Yorkshire Laureate

Quincy took her up the Ras,
He went at it Full Sail,
The Nymphe was shaken violently
And pitching on her rail.

But the Captain waved his hat on high,
and shouted "Yes, Yes, Yes!"
He shot out of the lower end
And we all were most Imprest! 


Saturday, 15 September 2018

Summer 2019 IABSM 10mm


An alternate 2019 Summer Campaign game suggestion


I ain't been shot Mum, 10mm Cassino, the attack on Cassino 

Up to three players can each command a company sized force advancing in sectors on table against up to three German Companies.  Players have an entire Battalion at their disposal but can only field a single company at a time, The close nature of the terrain makes this concentration of troops possible on table.  

Because of the Multi National Allied forces either US or Commonwealth Infantry or Armoured forces may be used by the player, just to mix it up a bit.  Similarly the Germans could be Fallschirmjäger or Panzer Grenadiers, Mountain or just plain Wehrmacht Infantry.  Note that I intend to deploy the Rajputs who were part of 4th Indian Division.

The basic premise is Operation Dickens, 2nd New Zealand Division vs 1st Fallschirmjäger Division but with US or other Commonwealth support.  


Player 1 
First Game Castle Hill 
Second game The Castle
Third game  German Counter Attack
Fourth Game  The Continental Hotel

Player 2
The Nunnery
The Jail
The Botanical gardens
The Hotel Des Roses North

Player 3
Tanks on the Outer Road
Post Office
Town hall
Hotel Des Roses South

Player 4
Fallschirmjäger Battalion Castle Hill 

Player 5 
Wehrmacht Battalion Town Centre

Player 6 
Panzer Grenadier Battalion - outer road and south side of the town

The Axis opposition was Richard Heidrich’s 1st Fallschirmjäger Division. Heidrich's three regimental commanders would be represented on table.  
Oberst Karl-Lothar Schulz, of 1st Fallschirmjäger Regiment occupying the town; 
Ludwig Heilmann of the 3rd Regiment around the monastery; and, 
Erich Walther, leading the 4th Regiment in the hills beyond.  

Finally his artillery brigade commander, is Oberstleutnant Bruno Schram, who may not have the firepower of the Allies, but due to their observational position on the mountain have far greater accuracy.  Schram and his gunners will be represented by a random fire mission table.


Notes
15 March 1944, Operation DICKENS, 6th New Zealand Brigade attacks the Italian town of Cassino as part of the Allies’ advance on Rome.  This will be a series of games for objectives in the town, Tanks on the perimeter road, Castle Hill, the Railway station, the Continental Hotel, all using company sized forces.  Objectives would be dealt randomly on cards on a game by game basis, and losses would accrue from game to game, until a Company must be retired from the action at 50% strength to rest and refit.

The Germans tenacious resistance from hidden positions in the maze of rubble that was once Cassino is some of the most difficult streetfighting in WW2.  After eight days of fighting from one shattered building to the next, General Freyberg decided the cost was proving too high and he ordered his troops to stop the attack. 

Picture


The attack on 15 March relied on a planned bombing campaign which reduced Cassino a pile of rubble.  Predictably the German defenders rallied quickly and put up staunch resistance among bomb craters that flooded as heavy rain set in, turning the rubble into a morass.  The terrain would be Mediterranean style buildings and scratch built walls and ruins (easy enough to do and the look would be spectacular.


The Avalon Hill game map.  A useful terrain guide. 
The Allies start at the bottom of the map. 

http://archive.is/www.bayonetstrength.150m.com

Thursday, 13 September 2018

The Biscay Cruise. Admiral Howe's Orders.


Please note that the Satyr's Captain is "Christmas" Quilp. 
He clearly hasn`t paid the printer!
Being a Marshal Petain Gentleman's Club's 
Blog and email Kriegspiel game for Autumn 2018, and a follow up to the Channel Islands Patrol reported in earlier posts.  This is a Naval Kriegspiel and utilises extant period Naval charts over which the combatants manoeuvre and fight.  This is however a joint enterprise as well as being competitive, since both players take the role of Royal Navy Captains, and the cunning and overweight Umpire controls the French by use of reaction tables and the "French Plan", which is historical, and will only be deviated from in response to the actions of one of our players.  I shall publish the "French Plan" at the end of the cruise.  They are in effect programmed...


The Umpire will conduct all battles, using the "Post Captain" rules,  according to the orders received from the RN Captains involved.  I will also deliver blog reports on the action.

If there are any other volunteers out there I have roles for a few more Captains, whose actions are currently under planned orders but who could just as easily be played. Just let me know in the comments below.


Gentlemen you have been invited to the Day cabin aboard the first rate HMS Queen Charlotte of 100 guns, Lord Howe's flagship on the blockade at Brest.  You will be briefed individually on your mission by the Political Officer Lord D`Arcy Pue who will accompany one of your ships.  Lord Howe's remarks are summarised by the Secretary into orders:

Orders to our Loyal and Good Servants, Captains Quincy Whitmore Jr and Christmas Quilp, Writ this day 24th May 1794

As you are aware...
the political situation this spring 1794 is that the French Regicides, under their National Convention, are at war with all their neighbours. Famine is imminent, and unrest growing, particularly along the Biscay Coast.  The French Committee of Public Safety has requested a grain convoy from the French colonies and the perfiduous United States, to be convoyed across the Atlantic during April, May and June, accompanied by a small escort squadron.

This convoy must not get through.  The French have a second, larger squadron in the Bay of Biscay and as if this were not bad enough the French Atlantic Fleet, under Admiral Villaret de Joyeuse, has vanished into the Bay of Biscay.

Note that political upheaval has severely reduced the French Navy's ability to fight coherently and supply shortages have devastated its morale, whilst at home we are suffering from a severe shortage of trained seamen.  Your Frigates have been crewed and made ready in all respects for sea.  Due to a severe shortage of Royal marines you will each take a Lieutenant, Sergeant and 30 men of the 29th Regiment due to the nature of the Political missions you have been assigned.

Your orders are to sail into the bay, and find that Fleet.  Lord Howe and the whole Channel Fleet are relying upon the success of your Mission.  Find that fleet,

Winston Wolfe
Secretary to the Lord Admiral

It is 0800 in the Forenoon watch and you have just returned from meeting the Admiral aboard HMS Charlotte 100.  We are lying off Brest at 48.7N 5.0W in 70 fathoms, and the rocks known as the Saints are fine off our port bow.  The seabed is sand.  The wind is Southerly and the sea state is 4 Moderate with a long swell.  It will be worse in the Bay.

Links to orders.  Eyes only...

Specific Orders for Captain Quilp HMS Satyr


Specific Orders for Captain Whitmore HMS Nymphe


Link to the Bay of Biscay Naval Chart
Other more detailed charts will be issued as required, for instance on entering Quiberon Bay, or the Basque Roads.

The chart showing Missions

The detailed Quiberon bay chart


Morning Watch 24th May


How to sail a ship using a chart and bearings.

Ships have variable speed depending on the sail set, the wind strength and the bearing to the wind.
Ships also have a “Top speed” based on the length of the keel, displacement of water and beam of the vessel.  HMS Victory was reckoned to achieve 9 kn in strong winds.  Smaller vessels could achieve this in lighter airs.

As Commander you can order various sail settings.

Full Sail with Studding sails set.   Basically the lot.
Full Sail     Every sail on the yards in use.
Plain Sail   The heavier sails for stronger winds
Storm sail  The minimum sail, courses reefed up.
Battle sail   Usually only topsails and jib.

The ships speed is calculated in knots – 1NM per hour is a knot.  Taking a reef into the sails reduces speed by 1 kt.  I will generally give you a logged estimated latitude and longitude, but please note that this will not be 100% accurate.  The map is gridded Latitude and Longitude.  Nymphe and Satyr would report the above position as 48.7N 5.0W.  The Royal Navy deliberately calculated a nautical mile short, the idea being that this made running ashore more unlikely. 

I will give you headland sightings, and sea bed composition in the ship’s log where these are available.  A picture of my game on the map will have only the detail that your ship could see, and may therefore be useless for navigation, especially in a squall, fog or at night.

On the subject of night time I would refrain from full sail around these waters in poor visibility.
A lookout can theoretically see about 10NM, but note that in the Bay there are many places ships may suddenly appear from, as well as sea mist and squalls.

I will be on hand to give you advice from the Ships Master on Navigation, the 1st Lieutenant on shipboard matters, the Gunner on firing and the Carpenter on your leaky bottom. (all via the ships log) 

For example the Sailing Master should inform you if your course is likely to run the ship aground.  The First Lieutenant will report disciplinary matters...

The game is played in “watches,” with movement every 4 game hours, but orders are daily, as the Captain's orders for the day.

    First watch: 2000 to 0000
    Middle watch: 0000 to 0400
    Morning watch: 0400 to 0800
    Forenoon watch: 0800 to 1200
    Afternoon watch: 1200 to 1600
    First dog watch: 1600 to 1800
    Last dog watch: 1800 to 2000


Ships Log

Captains orders for the day of ........................  Wind (Direction wind coming from)  .......................

Course, sail setting, Actions to be taken.


Watch Officers will then report back with Any Item of Interest occurring during their watch.

Further orders may be required if other vessels are sighted, or if the captain intends something like a cutting out expedition. 

Some advice:
Based on the advice Nathaniel Drinkwater was given for the Bay as well as Moore’s observations.

Beware the sudden Squall.  Have at least one good deck Officer. 
An anchor has a 100 fathom cable, measurement is in terms of cables (1/10 NM) and Nautical miles.  The Bay has relatively shallow water, so don`t be afraid to get the anchor down.
The French have shore batteries that will lob a shot out at least a mile.  The typical French trick is to anchor off these.
If you sail off the map I have other charts that will allow you to complete a chase, but your patrol area is that of the Bay of Biscay and you risk censure for being off it.
If you take a prize you must send an Officer, Warrant Officer or Midshipman with a number of crew, to sail the prize into Plymouth (or any British port).  

As always, Prize Monies reflect your Personal Victory points in this game.


24 May 1794


Link to Met Office Notes on the Sailing Conditions in the Bay of Biscay.  These will be used to generate the "weather."


Wednesday, 12 September 2018

Winter of Discontent. Part three. For, Lords, To-morrow is a Busy Day


For, Lords, To-morrow is a Busy Day


For this test I used the same scenario, the Battle of Newark, as I used for the Tree of Battles game. This immediately highlighted a key difference between the two rulesets; ‘To-morrow is a Busy Day’ doesn’t really translate very well to scenarios. Now don’t get me wrong, it’s perfectly doable but a large proportion of the rules are dedicated to generating pick-up games. It’s a very innovative system but it is a bit quirky. Under most other rules systems the size and composition of your army will no doubt influence your deployment and tactics in the game. However, in ‘To-morrow is a Busy Day’, it is the other way around. You have a number of ‘strategy cards’ from which you select your preferred plan. The chosen card will have not only a prescribed deployment but an army composition on it. This will tell you the number and type of contingents that you have plus how they are divided into battles. After that you then dice to see the size of your individual contingents.

For this game I would have to miss out all the strategy card element and just use the same number and type of contingents as the last battle. I did however dice for the size of the contingents. There are three sizes of battles catered for, each differing only in the size of the contingents used. These are designated as Hastily Raised, Full Array and Epic Host. Typical contingent sizes, in terms of the number of bases, are 5 to 7, 8 to 11 and 11 to 16 respectively. I chose the Hastily Raised option as being more in line with the original scenario.
Another difference is in the number of leaders employed; in ‘To-morrow is a Busy Day’, the number of available leaders is randomly generated and the leaders of the battles are chosen from these. As I was only deploying 2 battles, rather than the traditional three, I only used 2/3 of the dice generated leaders, giving 3 leaders each. Fortuitously, the Yorkists diced up King Edward and the Duke of Gloucester, as per the original scenario, but this time they were joined by Norfolk. For the Lancastrians I diced up: Somerset, Clifford and Oxford. The rules place the leaders in order of seniority, so this time the 2 Lancastrian Battles would be led by Somerset and Clifford.
Now the armies were all set it was time to deploy. If playing against an opponent, deployment is carried out by each player alternately placing a battle. Battles start in bow range of the enemy, which is defined as 3 or 4 handspans! There is no indication of what you do with the leaders at this stage, so I simply attached them to contingents in their own battle.
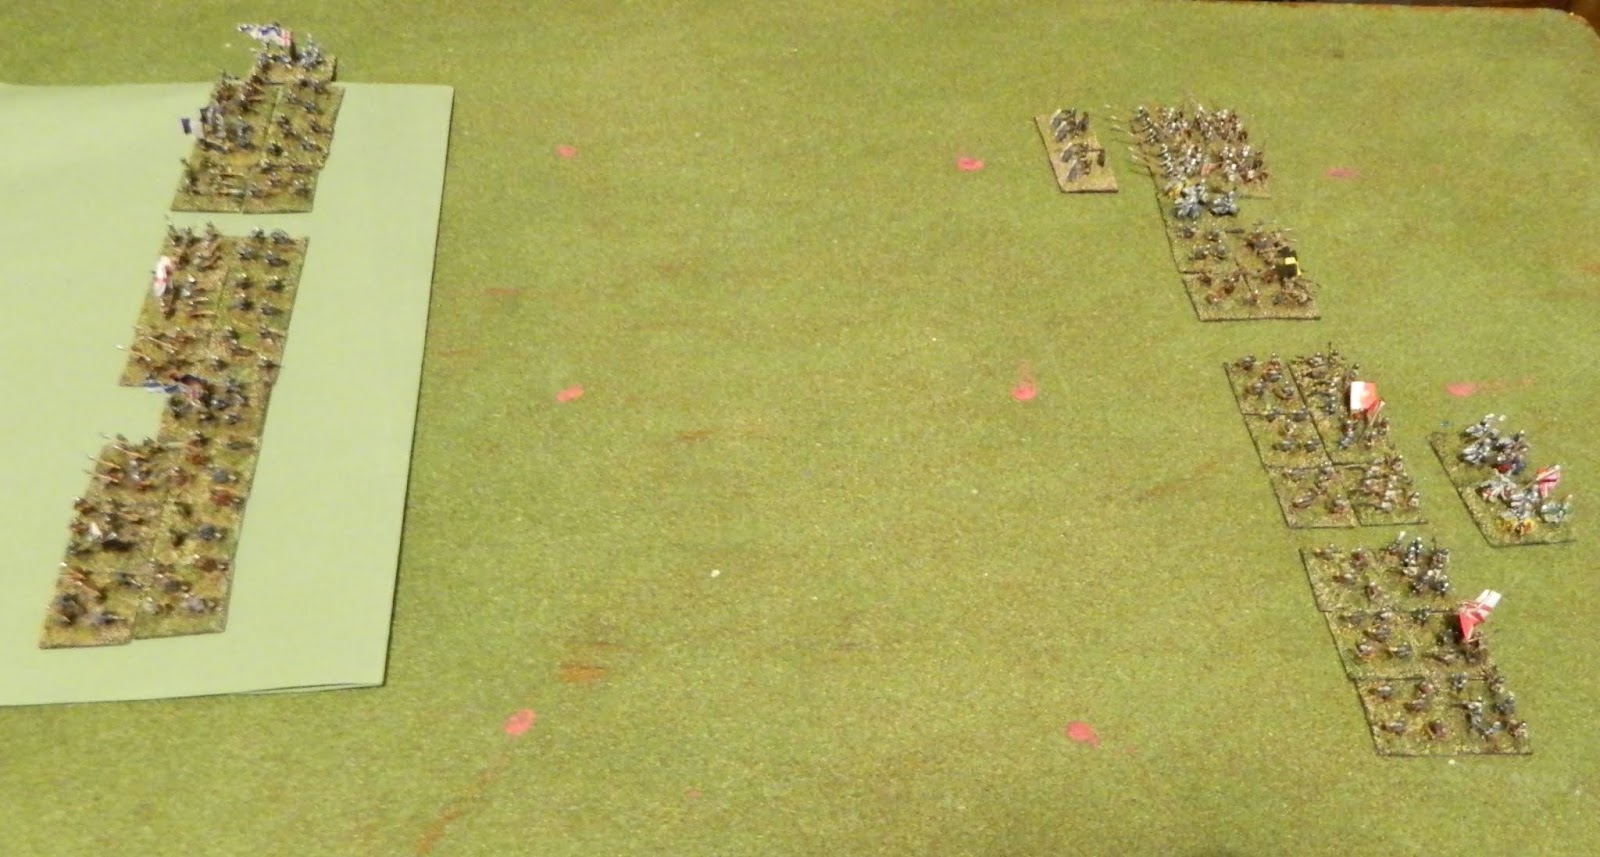
The armies deploy

After deployment you now determine the ‘Combat Effectiveness’ of each contingent by rolling an average die. Combat Effectiveness is something of a misnomer as it doesn’t seem to affect either shooting or melee. However, it is an indication of morale; if it reaches 1 the contingent cannot advance and if it falls to zero then the contingent flees.
Its now that the rules get surprisingly vague. After a relatively detailed explanation of how to generate battles, lasting several pages, there is no real guide on how to actually play the game. There is a section headed ‘Turn Sequence’ that is noteworthy for not actually describing a turn sequence at all. All I could infer from this section is that there would be an archery duel until one side decided to attack and close combat would then follow. I’m not at all sure how you’re meant to do this; alternately by battle as in the deployment phase, simultaneously or alternate in an IGOUGO fashion? In the end I just decided the order in which each battle would take its turn by a random die roll.

So it’s on to the shooting phase. Each contingent containing missile troops has four good shots before it runs low on arrows and can shoot twice per turn. Hence, I decided to take two turns of shooting before attacking with the Yorkists. As troops start the game in bow range there is no measuring and the shooting procedure is quite straight forward. You roll a D10, add a few modifiers and then read off the result from a chart. Results are given with a colourful descriptor such as visible damage, enemy hurt badly or withering fire. In game terms this can result in the enemy losing a base or losing a point of combat effectiveness. A good shot can also give you a +1 modifier on your next shot. Conversely a bad shot can give you a negative modifier. 

The end of the archery duel
So after 2 turns of shooting the Lancastrians had come off worst with several contingents dangerously low on Combat Effectiveness (CE). By contrast some of the Yorkist contingents had actually gone up in CE. As both sides were now low on arrows it was time for the Yorkists to attack. The attacking side normally has to endure 2 shots as it closes in – one at effective range and one at point blank. However, with a -3 modifier for being low on arrows this was not likely to be effective. Moving into combat was simple as there aren’t any movement rules as such, instead you just move them into contact. 
The Yorkists attack - King Edward in reserve
 Combat is similar to shooting, i.e. a D10 plus modifiers. However, this time leaders can choose to lead from the front and add their leadership value to the total. Again combat results are given with a descriptor such as gaining upper hand, enemy pushed back or enemy faltering. The actual game effect of these various combat results is similar to archery with a range of fleeing bases, decreases in combat effectiveness or modifiers to the next round of combat.

On the Yorkist right flank the mercenaries were quite effective due to a +3 modifier for pikes at first contact plus an extra +1 for supported by handgunners. This resulted in them pushing the Lancastrians back up the hill.
On the opposite flank, the Lancastrian contingent led by Clifford was down to a CE of 1. A good attack from Norfolk saw this drop to zero and the contingent routed. Combat effectiveness is also affected by seeing adjacent friends flee so the neighbouring contingent dropped 2CE and also routed. Both victorious Yorkist contingents were forced to pursue – also leaving the field. However, they did still have the mercenary pike on the field plus King Edwards contingent in reserve.
However, I decided to leave it there as the Lancastrians only had one remaining contingent and that was down to a CE of one.


Endgame - the Lancastrians flee

In summary the battle only lasted for 3 turns and two of those were archery. With no measurement involved it was all very quick. Granted this was a very small encounter with 3 or 4 contingents aside as opposed to the more typical 10. However, I’m not convinced that more contingents would have made much difference. Perhaps I need to try a bigger game? The rules also imply that more stands in a contingent makes them more resilient however as the size doesn’t alter the combat effectiveness I don’t see how this works. Perhaps I’m missing something.
The verdict – the jury’s out on this one; more testing needed I think. However, my gut feeling is that there are some very innovative ideas but it doesn’t quite work. The lack of movement rules, in particular, would seem to prevent using them for anything other than a stylised head on fight. On the plus side I can see how these would be great for solo play where it’s really the narrative that counts. Conversely, I think they’re altogether a bit vague for playing against an opponent.

Tuesday, 11 September 2018

Winter of Discontent. Part Two - The Tree of Battles


The Tree of Battles


The first step in my WOTR project is to take a look at some alternative rulesets to our old faithful ‘Bloody Barons’.
I’ve decided to begin with Simon MacDowall’s ‘The Tree of Battles.’ This set is subtitled ‘European Warfare AD 1300 – 1500’ and the author claims to ‘…have taken care to ensure that these rules work particularly well for the Hundred Years War and Wars of the Roses.’ Sounds ideal then.
The rules are actually an adaptation of the author’s Dark Age ruleset, ‘Comitatus’. I have in fact played a couple of games of the latter and did toy with the idea of using them for my own Dark Age project, although his ‘Shieldwall’ variant may be more appropriate for my purposes. That aside, many of the mechanisms are common to both which is a promising start as I quite liked ‘Comitatus’.
To test out the rules I decided to play the scenario which is available on the author’s blog – ‘The Battle of Newark, 1471’. This is a fictitious, what-if, type scenario and the only published Tree of Battles scenario of which I am aware. For this I needed to organise my figure collection into 2 armies. This was relatively straight forward as the rules deal with figure bases (or stands as the rules term them) and not individual figures. As with many modern rule sets, base sizes are not critical, as long as both sides’ bases have the same frontage. Recommended sizes are a 20 mm frontage for 6 mm scale figures and 40 mm frontage for 15mm scale figures. Fortuitously my 10 mm scale bases, at 30 mm frontage, fall nicely in this range.
All the usual troop types are catered for and the scenario calls for Men at Arms, Archers, Billmen, Pikemen, Handgunners, Scourers and Artillery. The scenario lists what type of stands are available and the player picks a certain number from the list (25 stands for Yorkists and 20 for Lancastrians). Normally stands are grouped with others of the same type to form contingents; although mixed contingents, of bow and bill for instance, are allowed. The contingent is the smallest independent unit in the rules. Oddly the rules don’t seem to give any indication of how big a contingent should be but, reading between the lines and using the scenario orders of battle, I settled on between 4 and 6 stands. Contingents are then assigned to ‘Battles’; three being the normal number but, as a small encounter, this scenario calls for two each. Each battle is commanded by a ‘Captain’ and the senior Captain is also the army commander or ‘Marshal of the Host’.
For my game the armies were as follows:
Yorkists
King Edward IV (Marshal of the Host)
Retinue 2 Stands Men at Arms, A class (Edwards’s personal troops)
Retainers 2 mixed contingents (each 3 stands archers and 3 stands billmen, B class)
Richard Duke of Gloucester
Retinue 1 Stand Men at Arms, A class (Gloucester’s personal troops)
Midlanders 1 mixed contingent (2 stands archers and 2 stands billmen, C class)
Flemish Mercenaries (2 Stands Handgunners and 4 Stands Pikemen, B class)
Lancastrians
John de Vere, Earl of Oxford (Marshal of the Host)
Retinue 1 Stand Men at Arms, A class (Oxford’s personal troops)
Retainers 1 mixed contingent (each 3 stands archers and 3 stands billmen, B class)
Henry Holland, Duke of Exeter
Retinue 1 Stand Men at Arms, A class (Exeter’s personal troops)
East Anglians 2 mixed contingents (each 3 stands archers and 3 stands billmen, C class)

The game was played, lengthwise, on a two by four foot table. I didn’t use any terrain other than a large hill on the Lancastrian side (as this was just a test I used a large piece of green card for this). My idea was that the Lancastrians would hold the hill and the Yorkists would advance to the attack. I diced for the relative position of the battles within each army and in both cases the Marshals took the leftmost battle. The rules require that each captain is given an order (chosen from Hold, Advance or Attack) and must test to see if they obey them. I gave Exeter a Hold order and Gloucester an Attack order; predictably both disobeyed with Gloucester reverting to Hold and Exeter Advancing!

The Armies Deploy - Lancastrians on the oddly square 'hill'!

Exeter prepares to advance - contrary to orders

There are three movement zones in the game; essentially outside bow range, inside bow range and up close and personal. Outside bow range, units may make march or approach moves. Inside bow range, units make tactical moves but cannot approach closer than a base width to the enemy. The latter can only be entered by a charge into close combat. There is a random element to tactical moves; the move distance being governed by a die roll. Any 5s or 6s rolled resulting in a Disorder point. The constituent contingents of a battle are also encouraged to move together; troops not so ‘embattled’ are subject to a control test.
The concept of Disorder points (or Death, Disorder and Desertion Points to give them their full name) is crucial to the game. Disorder points may be accrued for moving too fast or through difficult terrain; receiving heavy casualties from shooting or melee; or from morale issues such as seeing friends flee etc. They may be removed by resting or by a Captain using a ‘Steady Troops’ action. If a contingent acquires 5 Disorder points (or 6 for a large unit) it falls into disarray. This may be recovered from but failure to do so could result in stands being removed or the entire contingent fleeing.
In the test game both Exeter and the King’s forces advanced rapidly upon each other (due to Exeter disregarding his hold orders) and swiftly came to close range. Gloucester’s battle was delayed, as he initially disobeyed his orders to attack. When he did come within bow range his Midland levies took heavy casualties (i.e. acquired lots of Disorder points) and halted. The short range archery duel between the King and Exeter was murderous with large amounts of Disorder being heaped on both sides. Luckily, Edward’s higher command rating meant his troops could recover quicker – although the King was wounded in the process (a hazard of rallying whilst close to the enemy).
Eventually, Edward’s troops charged forwards. In the resulting melee Exeter’s troops acquired enough Disorder points to become disarrayed. In such a condition, the outcome of a second round of melee was predictable and the East Anglians fled.

Exeter's flight signals the end of the battle
I called a halt at that point, feeling that I had gained a good overview of the system. The verdict? Not bad; it’s difficult to tell from one game but the rules have definite potential and I’m keen to give them a proper go against an actual opponent.
Next up - For, Lords, To-morrow is a Busy Day

Winter of Discontent

OK, so it’s only autumn and the discontent is only really a niggle but the phrase seemed apposite. Yes we’re talking Wars of the Roses here. Now, as fellow Petains will be aware, I have a reasonably large WOTR collection in 10mm scale that I game with using Peter Pig’s ‘Bloody Barons’. However, for some time now, I’ve not been happy with the basing and have been considering a rebase. Don’t get me wrong, there’s absolutely nothing wrong with the style of basing or the base dimensions, in fact I rather like the Peter Pig style square bases, no it’s the actual basing material / colours that I don’t like. The main problem is that the bases have a sort of camouflage effect that obscures the figures and with my ageing eyes I really need the figures to ‘pop’. I have actually bought some replacement bases but I just haven’t settled on an alternative basing scheme yet.

10mm troops - I know the photo is blurry but then again so are my eyes!

Anyway that’s just a long winded way of saying that a WOTR project has been at the back of my mind for some time now. As it happens a fellow member of ‘the other club’ also has a 10mm WOTR collection, currently unpainted, but has never settled on a set of rules. Whilst I really like Bloody Barons, they’re far from perfect and I have ‘tweaked’ them to better reflect my preconceptions. They do give a cracking game though and they have been very popular at the club. Are they just that though – a game? How well do they reflect the warfare of the time? To be honest, I’m not sure and ultimately I’m not even convinced that the question can even be answered. However, I do fancy taking a fresh look at the period and re-examining some of my own preconceptions. Somewhere, buried in the depths of my war room (aka the garage) I have a notebook containing my thoughts and ideas on the period but this may be a better way of recording the project. I also know that some of the Petains are ardent medievalists so hopefully this will serve as a source of useful discussion points – even if only carried out in the pub.
So first off I want to look at some alternative rule systems. For the purposes of this exercise, or at least to begin with, I shall restrict this study to rules that are period specific. At the moment I have copies of Poleaxed 2, Bloody Barons, Tree of Battles, and Coat of Steel plus I have borrowed a copy of, the snappily titled, ‘For Lords, Tomorrow is a Busy Day’. I’m sure other rule systems are available but this selection will be more than enough to begin with.

Poleaxed 2, Pat McGill and Dave Lanchester, 2001

“For, Lords, To-morrow is a Busy Day”, Keith John Warren, 2001


Bloody Barons, RFCM, 2005

A Coat of Steel, Perfect Captain, 2010

The Tree of Battles, Simon MacDowall, 2012