The Tree of Battles

The
first step in my WOTR project is to take a look at some alternative rulesets to
our old faithful ‘Bloody Barons’.
I’ve
decided to begin with Simon MacDowall’s ‘The Tree of Battles.’ This set is subtitled
‘European Warfare AD 1300 – 1500’ and the author claims to ‘…have taken care to
ensure that these rules work particularly well for the Hundred Years War and
Wars of the Roses.’ Sounds ideal then.
The
rules are actually an adaptation of the author’s Dark Age ruleset, ‘Comitatus’.
I have in fact played a couple of games of the latter and did toy with the idea
of using them for my own Dark Age project, although his ‘Shieldwall’ variant
may be more appropriate for my purposes. That aside, many of the mechanisms are
common to both which is a promising start as I quite liked ‘Comitatus’.
To
test out the rules I decided to play the scenario which is available on the
author’s blog – ‘The Battle of Newark, 1471’. This is a fictitious, what-if,
type scenario and the only published Tree of Battles scenario of which I am
aware. For this I needed to organise my figure collection into 2 armies. This
was relatively straight forward as the rules deal with figure bases (or stands
as the rules term them) and not individual figures. As with many modern rule
sets, base sizes are not critical, as long as both sides’ bases have the same
frontage. Recommended sizes are a 20 mm frontage for 6 mm scale figures and 40 mm
frontage for 15mm scale figures. Fortuitously my 10 mm scale bases, at 30 mm
frontage, fall nicely in this range.
All
the usual troop types are catered for and the scenario calls for Men at Arms,
Archers, Billmen, Pikemen, Handgunners, Scourers and Artillery. The scenario
lists what type of stands are available and the player picks a certain number
from the list (25 stands for Yorkists and 20 for Lancastrians). Normally stands
are grouped with others of the same type to form contingents; although mixed
contingents, of bow and bill for instance, are allowed. The contingent is the
smallest independent unit in the rules. Oddly the rules don’t seem to give any
indication of how big a contingent should be but, reading between the lines and
using the scenario orders of battle, I settled on between 4 and 6 stands.
Contingents are then assigned to ‘Battles’; three being the normal number but,
as a small encounter, this scenario calls for two each. Each battle is
commanded by a ‘Captain’ and the senior Captain is also the army commander or
‘Marshal of the Host’.
For
my game the armies were as follows:
Yorkists
King
Edward IV (Marshal of the Host)
Retinue
2 Stands Men at Arms, A class (Edwards’s personal troops)
Retainers
2 mixed contingents (each 3 stands archers and 3 stands billmen, B class)
Richard
Duke of Gloucester
Retinue
1 Stand Men at Arms, A class (Gloucester’s personal troops)
Midlanders
1 mixed contingent (2 stands archers and 2 stands billmen, C class)
Flemish
Mercenaries (2 Stands Handgunners and 4 Stands Pikemen, B class)
Lancastrians
John
de Vere, Earl of Oxford (Marshal of the Host)
Retinue
1 Stand Men at Arms, A class (Oxford’s personal troops)
Retainers
1 mixed contingent (each 3 stands archers and 3 stands billmen, B class)
Henry
Holland, Duke of Exeter
Retinue
1 Stand Men at Arms, A class (Exeter’s personal troops)
East
Anglians 2 mixed contingents (each 3 stands archers and 3 stands billmen, C
class)
The
game was played, lengthwise, on a two by four foot table. I didn’t use any
terrain other than a large hill on the Lancastrian side (as this was just a
test I used a large piece of green card for this). My idea was that the
Lancastrians would hold the hill and the Yorkists would advance to the attack.
I diced for the relative position of the battles within each army and in both
cases the Marshals took the leftmost battle. The rules require that each
captain is given an order (chosen from Hold, Advance or Attack) and must test
to see if they obey them. I gave Exeter a Hold order and Gloucester an Attack
order; predictably both disobeyed with Gloucester reverting to Hold and Exeter
Advancing!
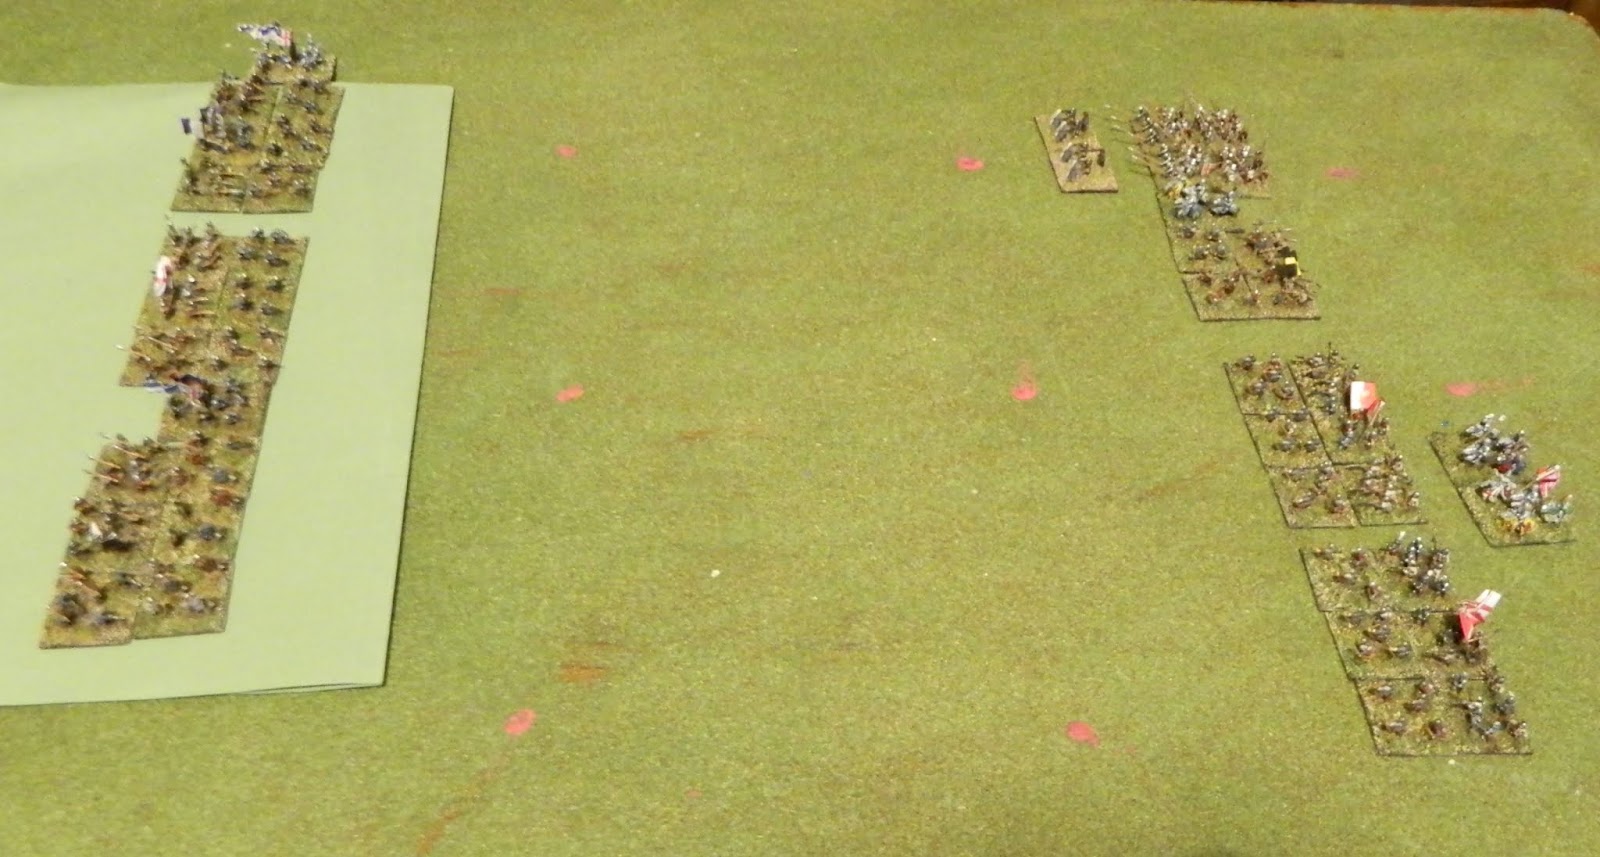 |
| The Armies Deploy - Lancastrians on the oddly square 'hill'! |
 |
| Exeter prepares to advance - contrary to orders |
There
are three movement zones in the game; essentially outside bow range, inside bow
range and up close and personal. Outside bow range, units may make march or
approach moves. Inside bow range, units make tactical moves but cannot approach
closer than a base width to the enemy. The latter can only be entered by a
charge into close combat. There is a random element to tactical moves; the move
distance being governed by a die roll. Any 5s or 6s rolled resulting in a Disorder
point. The constituent contingents of a battle are also encouraged to move
together; troops not so ‘embattled’ are subject to a control test.
The
concept of Disorder points (or Death,
Disorder and Desertion Points to give them their full name) is crucial
to the game. Disorder points may be accrued for moving too fast or through
difficult terrain; receiving heavy casualties from shooting or melee; or from
morale issues such as seeing friends flee etc. They may be removed by resting
or by a Captain using a ‘Steady Troops’ action. If a contingent acquires 5
Disorder points (or 6 for a large unit) it falls into disarray. This may be
recovered from but failure to do so could result in stands being removed or the
entire contingent fleeing.
In
the test game both Exeter and the King’s forces advanced rapidly upon each
other (due to Exeter disregarding his hold orders) and swiftly came to close
range. Gloucester’s battle was delayed, as he initially disobeyed his orders to
attack. When he did come within bow range his Midland levies took heavy
casualties (i.e. acquired lots of Disorder points) and halted. The short range
archery duel between the King and Exeter was murderous with large amounts of
Disorder being heaped on both sides. Luckily, Edward’s higher command rating
meant his troops could recover quicker – although the King was wounded in the
process (a hazard of rallying whilst close to the enemy).
Eventually,
Edward’s troops charged forwards. In the resulting melee Exeter’s troops
acquired enough Disorder points to become disarrayed. In such a condition, the
outcome of a second round of melee was predictable and the East Anglians fled.
 |
| Exeter's flight signals the end of the battle |
I
called a halt at that point, feeling that I had gained a good overview of the
system. The verdict? Not bad; it’s difficult to tell from one game but the
rules have definite potential and I’m keen to give them a proper go against an
actual opponent.
Next
up - For, Lords, To-morrow is a Busy Day
No comments:
Post a Comment